Frisco Brews: Red Vegito is Back!!!

By Frisco Fahs

Hey Scuba Scrubs! 

We’re back with another deck profile and my first deck profile with the new Anniversary product that’s going to be released in the coming weeks. I’m super excited to go over my Vegito Deck profile that I’ve been working since Vegito, Resolved Combined was teased. Let’s dive right into it!

Click Here for Shenron’s Lair Deck List Link

What does this deck do?

The goal of this deck is to play Hyper Rush SSB Vegito on Turn 2, 3 and maybe 4. The way you do this is by using Vegito, Polymorphic Potara on turn 1 and Union-Potara with Vegito, Resolved Combined and use the Activate Main on turn 2. You can also, do this play by playing a 1 drop Goku/Vegeta on turn 1 and spend 1 energy on the 2nd turn on the Goku/Vegeta you need with a Senzu bean to make the same play live. Also, you can achieve the same goal with a Saiyan Duo Son Goku/Vegeta Package or a turn 2 Vegito, Polymorphic Potara with a Senzu Bean. There’s a lot of nuances that I will get in with the card interactions portion of the article.

Mulligan Strategies: 

This is probably the most important section of the article because you need to know how the deck is built and functions to plan accordingly on your mulligan.

Priority 1 – You need a Vegito, Resolved Combined in your opener. If you don’t have it, mulligan all 6 back. If you do, move onto the next Priority.  

Priority 2 – You need a Polymorphic or a Senzu Bean. Since the deck requires 1 drops or playing both Goku’s and Vegeta with 1 energy, it’s best to have a Senzu Bean to if you don’t have a polymorphic since you can make your Hyper Rush turn happen more consistently.

Priority 3 – Keep a 1 drop Goku’s/Vegeta’s as the alternate way to Union-Potara so you can awaken turn 2 when you take your own life 3 times (1 life with a Goku/Vegeta and 2 life with Hyper Rush and the 4th life will be coming from an opponent’s attack turn 1 attack)

Important Interactions to Note:

Broly, Ultimate Agent of Destruction: I think the biggest shock to the deckis the SCR choice. Well, I like free things and this card is played for free after my opponent has to deal with my threats or I can offensively trigger his auto with Belmod, Double Devastation. This deck as many ways to go to 1 life like all the 1 drops and Hyper Rush himself! There’s another cool target for Broly. Find Out below!

Son Goku, Strength of Legends: Yep, he’s back againand better than ever! There’s a lot to note on this card. If you have more then 1 in your hand in the early game, he’s not only a black energy which helps a lot. You only need 1 yellow Vegeta/Goku to fulfil the cards conditions to play him for free turn 4. Also, he say’s you can’t Evolve of him but Union-Potara is a different skill so he’s a free Union-Potara target. Once you do that, you can play another for free from your hand which is awesome. Funny thing is, I think paying 4 for his Activate Main ability is better then paying for either Vegito SCR’s since Goku SoL plays around most of the Counter Play cards in the game! Just make sure to have at least 1 yellow energy charged by turn 4. Lastly, he’s a 9 drop that’s now a green battle card that also triggers Broly, Ultimate AoD with Belmod 4 drop which is insane!

Bardock, the Resolute: Just a FYI, you can’t play him after you use Polymorphic. Therefore, try to apply pressure before committing to that line of play to apply more pressure onto your opponent. The same goes for Belmod as well.

Tutors:  When you’re looking through your deck, you need to confirm what’s in your deck. How many 7 drop Vegito’s are left?  How many Saiyan Duo Vegeta’s are left? Is my Lightning Speed Vegito in the deck? All these questions need to be answered ASAP to insure you make the right lines of play for future turns. Make sure you don’t take too long since you can get called for time on this.

Lightning Speed Vegito: This card acts as a 5th copy of Hyper Rush Vegito. Once Hyper Rush is in your hand, you don’t really want to charge it since you need that red energy. Therefore, Saiyan Duo Son Goku makes a perfect way to pitch it out of your hand. Just make sure you have a Duo Vegeta in your drop or deck. Also, Son Goku Saiyan Reborn is a great way to get Hyper Rush out of your hand while accruing value. Also, blowing up a 3 drop or less during defense is not so bad after all!

Vegeta, resolve Renewed: If Green becomes more and more popular, you can probably max this out since it counters Frieza, Charismatic Villain!

Power Modifications: As a reminder, Senzu Bean, SSB Son Goku, Tenacious Warrior and Vegeta, Savior of the Future all transfer their power modification to their Union-Potara targets. Therefore, if you use Vegeta skills to take 1 life for 10k double strike, the Vegito, Combined Resolved would be a 35k but then you use the Activate Main, to go into Lightning Speed for a 30k Attack then into a Hyper Rush for a 35k Triple Strike.

Conclusion: 

The decks biggest weakness is itself. If you don’t see the 5 drop Vegito, you’re going to have a bad time. However, once you resolve 1 chain and awaken, you have a 10+ card hand which more often then not, it’s super easy to go in the second chain. I will be testing this deck in the gauntlet and see how it fairs against Invoker, Dredgeku, Syn Shenron and Vegeks. If I had to make an educated guess, I think the deck is definitely Tier 1.5 and has a decent shot to make an impact. I hope you enjoyed!

KKKkkkkkkkkkk, Byyyyyyeeeeeeeeeeeeeeeeeee!

Agents of Destruction… HERE TO DESTROY!!!

Why, hello #ScrubFam.  For those that don’t know me, I go by Brian Read (since that’s my name) – aka: hurricanegl. It is my pleasure to bring to you today, a deck list I am quite fond of and simply cannot wait to play with IRL.  First, a couple of obligatory shout-outs:  Thank you 3xG for providing me the opportunity to share this deck list and all the help you’ve provided me throughout the years of me playing DBS.  Big shout out to Richard Zapp for introducing me (and the world) to the OG Agents of Destruction deck way back with Dende AoD. Shout out to Daniel Brown for inspiring this with one simple comment to a FB post: “You should try Cell Xeno as the SCR”.  Now onto the STARS of the new Anniversary Box – the NEW Agents of Destruction.

https://www.shenronslair.com/DeckBuilder/View/b278992d-1fd1-4248-968b-5abf562406e8

Enter AoD by Babidi

So, this deck obviously revolves around all the new AoD cards we are getting in the new Anniversary box, starting with the leader: Babidi, Leader of the Agents of Destruction//Majin Buu, Leader of the Agents of Destruction.  For this deck I focused on the Yellow & Green AoD in order to work towards that spicy recommendation of Cell Xeno. The AoD Leader Front side we have the Permanent skill that removes all specified cost from <Agent of Destruction> cards.  It’s Auto allows you to take up to 1 life AND look at the Top 5 of your deck for a card with {Agent of Destruction} in its name.  (((Ruling Note: Bandai has ruled that Agent & Agents will be treated the same))).  This deck is HEAVY on the AoD cards so the probability of hitting one of these is VERY HIGH, especially when you add in the Extra Card AND the Unison Warrior as viable targets.  Back Side gets even better with TWO Activate: Main skills.  The first allows you to play a 2 cost or less card with <Agent of Destruction> in the name for FREE.  The 2nd costs 3 energy and allows you to play a Unison Card with {Agent of Destruction} in its name with 3 markers.

AoD Strikes Back

Now the leader is not our only new toy in the set.  Bandai really has produced some HIGH-QUALITY cards in this archetype. Let me tackle them in order of optimal play:

  1. Hatchhyack, Vengeful Agent of Destruction – the most IMPORTANT skill to get the deck going is the Activate: Main (1), discard this card from your hand : Play up to 1 <Evil Wizard Babidi> card with an energy cost of 1 from your deck…shuffle.
  2. Turles, Chaotic Agent of Destruction – this card lets you dig and thin, which is super important for finding all those pieces that can overwhelm your opponent.
  3. Garlic Jr, Immortal Agent of Destruction – this is our clutch Negate that when it gets played allows you to play a 2 cost or less AoD from your deck.
  4. Lord Slug, Mighty Agent of Destruction – the primary target of Garlic Jr.  He’s a Super Combo with Unique and a Counter: Play deterrent for your opponent.  Once he’s established, if your opponent activates Counter: Play they have to discard 2 cards….EVERY TIME.
  5. Android 13, Exterminating Agent of Destruction – Counter: Play that prevents a 3 cost or less from coming into play, play the card, and opponent discards 1. THEN it’s auto triggers and you can shuffle up to 2 AoD or Babidi back into your deck.
  6. Broly, Invincible Agent of Destruction – Activate: Main is ok, but not it’s meat and potatoes.  Auto is the money maker.  When you play this card, you choose an opponent Battle Card 5 cost or less, KO it, look at up to 3 cards of deck, take ANY 1 to hand, the rest go to drop.
  7. The Agents of Destruction Strike Back (Extra Card) – Permanent: The card gains <<Agent of Destruction>> in all areas. Activate: Main – look at the top 2 cards of deck, grab up to 2 that have {Agent of Destruction} in their name. Bottom deck the rest. If you took a card to hand, you may take up to 1 life.
  8. Vegeta, Resolute Agent of Destruction (Unison Warrior) – Double Strike & Critical. Auto, when you play him, pitch one and nuke your opponent’s board ignoring Barrier. (+1) Give him +5K powr. (-5) If your Leader is an <<Evil Wizard>> or all your energy is mono-green: Choose 3 cards in your opponet’s hand and discard them.

Playing the Curve

I have found that my first 3 turns are pretty standard, if I can pull it off.  I am looking to start with 2 cards in my opening hand: Hatch & Turles.  These guys get this deck going so I REALLY want to see them.  If I see Cell Xeno, then it’s my lucky day.  T1 I am looking to resolve Hatch to get Babidi in play.  I want him to turn all my 2 cost AoD into 1 cost, my 3 cost AoD into 2 cost, and my 1 cost Extra Card is now FREE. The lynchpin of this deck being absurd is Babidi, Overseer of Destruction.  It is a 1 cost card with Barrier AND the Permanent that reduces the cost of all <Agent of Destruction> cards in your hand by 1.  If I have the Extra card, I am playing it here to get some of the AoDs to hand, especially if I’m missing Turles. Attacking obviously depends on if you are on the play/draw.  When you can attack with the leader, do so to dig and thin the deck.

T2 I am looking to dig and thin some more to garner more resources.  So, I’m swinging with my leader, likely taking the life, and grabbing an AoD from my Top 5.  Then I am going to tap my 1 to play Turles thanks to No Specified Cost from leader and reduced cost from Babidi Battle Card.  I am looking to swing and dig for another AoD card. Again, if I have the Extra Card…I am going to play it for FREE.  I’ll take life so I can set up a T3 Awaken.  T2.5 I’m passing to my opponent with 1 energy up.  By now I SHOULD have a Garlic Jr and/or A13 in hand.  I will use my one energy on which ever is the best play for the situation. Usually this means I’m going to Negate with Garlic Jr and free play Slug from my deck.

T3 I should be set up to Awaken just needing my opponent to attack my leader ONE time.  Once I charge, I’m going to sequence in the most optimal way for the situation. I want to dig with my leader and with Turles. I want to get value out of my 1 energy I’m going to Untap from leader Awakening. This can play out in a variety of ways.  If I need to take another life to Awaken, I’ll play DPBMS.  If I need to draw, hopefully I have a Koitsukai in the drop to allow me to dig 2 cards deeper into my deck.  If neither of those are required, I likely just play another Garlic Jr or A13.  I’d prefer the Garlic so I can bring out an A13 off of his skill. Then I’m looking to Awaken.  Here I’m going to use Leader Skill to Free Play a 3 cost AoD.  This is possible, once again, due to Babidi on board making them cost 1 less.  Primarily, I want to play Broly.  He let’s me pop a card off my opponent’s field and dig deeper into my deck (I’ve hit my Cell Xeno SOOOO MANY times off Broly).  If I still need to dig, and I have a 2nd Broly in hand, I likely hard cast him for 2.  If not, I will play ANY of the other G/Y 3 Cost AoD.  I’m reserving my 1 energy in case I need to counter a counter: play.  This is where I start putting the real pressure. I swing like crazy using almost no combo power.  I just want to deplete my opponent’s life and/or hand. Once I’ve swung as much as I can, my opponent is likely sitting at 4 or less life.  I probably tap my last energy if I haven’t used it and play another 2 drop.  Swing one last time for another 15k base.  If my opponent still is surviving, they should have a relatively small hand.  So, my final trick is to sack 2 of my 3 Cost AoD and 3 of my 2 Cost for successor into Xeno Cell.  I’ve been able to do this so that I can swing 8-10 times for 11-14 damage on T3.  OPPRESSIVE.

The Extra Spots

The deck is obviously more than just AoD.  One of the toughest setbacks the deck has is limited natural draws. To compensate I went with a 2-2 split on Super Combos. AoD Slug for the effects and Roshi for the draw.  I also included 3 of the Goku Draw Ape to help me dig and recover if I fall behind curve. Koitsukai is a great draw engine with the added benefit of making my opponent pay if they want to Counter: Play me with a card that comes into play and has 20k or less power.

Also, in those games where my opponent is able to stall me out, I want the option to do it to them as well.  Putting Flying Nimbus in the deck can help me accomplish this.  Also, when the game goes longer, I can play out Vegeta AoD (Unison Warrior).  He works to reset my opponent’s board, apply more pressure, and gives me the opportunity to play Frieza, Charismatic Villain Counter: Play against them.

Conclusion

I LOVE THIS DECK.  It’s not Tier 0. But I think it will have a share in Tier 1.  There are “Unexpected” & “Righteous” answers to the deck. People should definitely start preparing now.  If you sleep on it, it will give you nightmares.  Can’t wait to hear feedback from all of you Scrubs like me out there.  Now grab a deck and get your game on.

The Beauty of Checks & Balances

Looking at all the cards within the S10 format as it is, from a purely competitive perspective, you’d probably gather that, without testing, Red and aggressive strategies in general would be the best archetypes in the format.

“Unisons are too slow”, “Dredgeku taking its own life is bad”, “You have to draw your floodgate”, etc.

These are all quotes from highly respected players within the community and in some ways, they are 24% (arbitrary %) right. In practice though, they, and a lot of other folks, got it wrong.

Post Universe 3 Bans there was a clear tier 1 that ended up developing –

“Vegeks is dead” – a quote heard around the DBS community once the U3 bans were announced, was quickly debunked by folks that adapted and added the actual Vegeks chain.

“Dredgeku is bad” – the power level of Dormant Potential Unleashed plus a built-in sweeper every turn led to an unprecedented showing in week 1 with 2 copies of Dredgeku facing each other in the finals of an event

These two quotes and quick debunking ultimately are what led to such a diverse meta game being created.

Green and hand destruction became so popular in week 1, that in the following weeks to come Syn Shenron and Invoker both ended up overperforming. Reason being, they go over the top of fair decks better than anyone else.

Yellow Gotenks even got a huge push, mostly due to the format’s diversity. This is a fact within the DBS TCG and is the reason Gotenks sits in Tier 1 – in a world of where there is high variance within your match-ups, playing the best cards and drawing more of them will get the job done.

Now we begin looking at the Gamerz event and events from this past weekend and Blue has started overperforming. This has to do with Vegito and Zamasu’s ability to win off of the back of non-battle card attacks combined with the fact that they both awaken early enough to stifle a lot of the aggressive strategies out there. Ultimately though, we saw Vegito fall into the finals of the Gamerz event to Vegeks; which logically makes a ton of sense. The average converted energy cost of Vegito’s deck is so much higher than Vegeks, and Vegeks can essentially play the game forever as long as it has access to Bibidi and Supreme Kai of Time.

The Defined Checks & Balances

Syn Shenron & Invoker < Red Aggro and Go-Wide Aggressive Strategies – These are decks that truly take over the game after turn 3 and both require a specific card to stabilize in the early turns, Aggro punishes variance and can heavily tax the resources of these decks in the first few turns.

Red Aggro < Dormant Potential Unleashed and Vegito – All of us dream of a world were we can play our Bardock, the Resolute and Mercenary Taos and turn our cards sideways to win the game; Dormant and Vegito singlehandedly render these strategies unplayable at the top tables.

Goodstuff Midrange Strategies < Vegeks, Invoker, & Syn Shenron – If you are a blue deck or a Gotenks deck, you’re going to struggle against strategies that do everything cheaper than you or interact with your battle cards whilst taxing your resources. Midrange decks are not unplayable by any means, they are just soft to drop area-based decks due to the lack of interaction combined with the fact that their battlefields are replenishable for little to no energy. To speak on Invoker and Syn Shenron, this has a lot to do with the fact that again, both of these decks go so far over the top of you and can defend themselves well enough to make the game go to the later turns.

Blue Goodstuff Midrange Strategies > Dredgeku – Decks that can stick a Unison and win with it often have a solid footing against Dredgeku. Combine that God-Sealing Technique trumps every threat in Dredgeku and you are already off to a good start as to why Dredgeku is weaker to blue. Zamasu and Vegito both present the option to win the game without battle cards, which is exactly where you want to be when your opponent’s ability to accrue advantage comes from saving life by wiping the field and spamming Dormant.

Gotenks = Dredgeku – this is of course play/draw dependent and really depends on if Dredgeku has Bardock Unison on time. If Dredgeku has it going first, that matchup leans hard towards Dredgeku; but if it doesn’t, Gotenks can out draw the hand destruction and pressure with a few key threats to close it out since the leader skill inherently hates on Dredgeku’s use of Dormant Potential Unleahed and other extra cards.

Vegeks < Dredgeku – a tale as old as time, the best deck at generating a board presence loses to the best removal and hand control deck in the game. This is probably my favorite match-up in the S10 format because even though Dredgeku is favored, experienced Vegeks pilots who are familiar with this match-up can find ways to pull it out if they lean hard into winning off the back of Gotenks Unison.

Does Invoker have Apex of Power? Yes > Dredgeku
Does Invoker have Apes of Power? No < Dredgeku

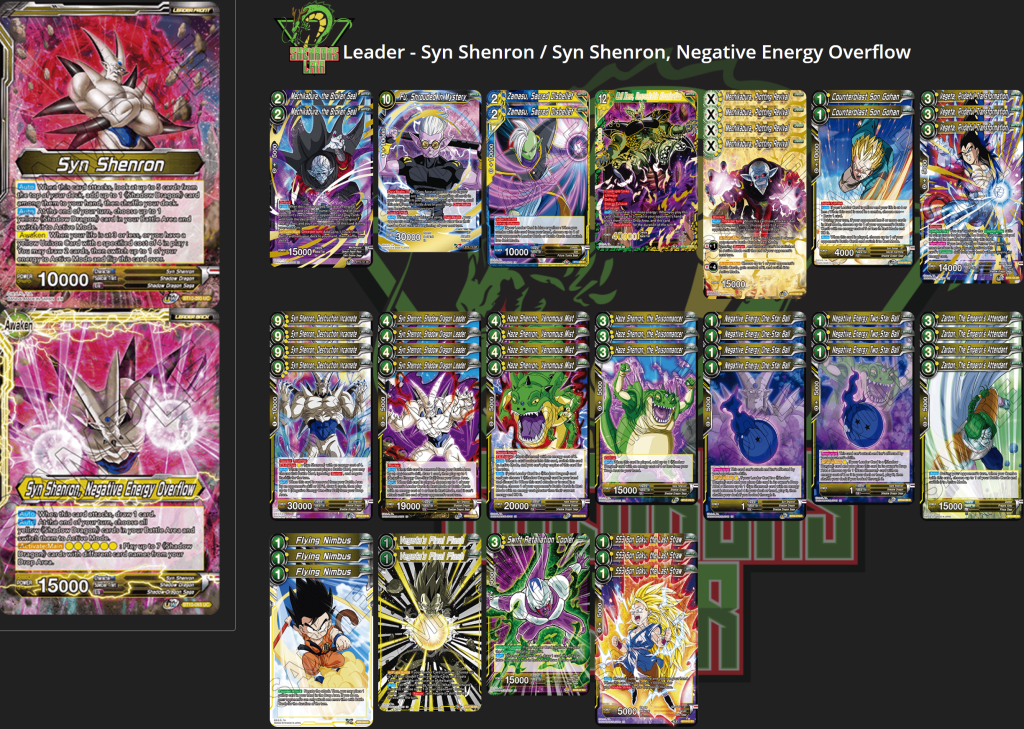
Syn Shenron > Dredgeku – we have a deck that wipes the board every turn against a deck that accrues card advantage whenever the board is wiped and can revive a billion-energy worth of battle cards on turn 6 and beyond. Play this matchup enough and you’ll start to feel bad for Dredgeku players across the community.

Invoker > Syn Shenron – the premier control decks of the format, and the deck that can deal burn damage is the deck that is favored. Unless Syn Shenron goes the route of Mechikabura, the Broken Seal into Fu, Shrouded in Mystery the following turn, and even then it still looks rough for our dragons.

Deck Selection for GenCon

To me, it is quite clear what must be done to perform well during these upcoming events and that is to either be the best aggressive strategy that allows you to play a longer game against midrange/control, or to be one of the decks that is the best at going over the top of all of the fair decks.

Of course, you can take the route of Buu or Reboot Gohan to try and be hyper aggressive, but those decks will struggle as the meta game becomes less varied towards the latter part of a highly competitive event.

With Blue having a strong showing last weekend people will begin latching onto those archetypes since some of their favorite players played them. This is the weekend to hard punish those players who adopted Zen-Oh, Cosmic Unison as their paramour.

Do not Get Too Fancy

Syn Shenron – 2x Mechikabura, the Broken Seal in the main along with Fu, Shrouded in Mystery (popularized by Ryan Severin)
“Stock” Invoker
Vegeks list that has been winning events lately, except I am not running 1x Hatchhyack

#Scrubfamisbestfam #KTHXBAAAIIIIII

Frisco Brews: Gogeta Strength of Legends

Scrub Fam!!!! We’re back with another Son Goku, Strength of Legends (SOL) deck profile. If you followed 3xG in the Draft Box 5 format, you probably remember me making several decks based around SOL with  Surgeku Leader. Now with Unisons and the restricted specified cost, we must tailor the deck in a different way. Check it out! 

What does the deck do? 

Currently, the deck is 52 cards. The idea of the deck is that Zen-oh, Cosmic Unison turns on SOL on turn 3 since the requirement of the card is that you need 4 energy. The goal is to mill or combo away the non-blue cards in the deck to make this possible. The main thing to note is that we’re sacrificing the Activate Main ability to make this happen. Then you can use your leader ability before attacking to bait a negate to finish them off with Fu, Shrouded in Mystery or SS4 Gogeta, Peerless Fusion. Another cool note is that Zen-oh unison get’s to 5 energy quicker to turn on your double strike for your leader swing. 

Mulligan Strategies. 

Zen-oh unison is the most important card in the deck. If you don’t open with it, mulligan everything back. If you do have it, try to mulligan for Vegeta, Savior of the Future to have your self-awakening tool. 

Card Choices 

Non-Blue Cards: The cool thing about being blue is that you’re mono blue card is accounted for. If you steer away to a different leader, then the best generic blue cards require you to charge a blue energy. This way, we can get value from Great Ape Son Goku, Saiyan Instincts and Furthering Destruction Ciampa without it costing any specified energy. Then, we can utilize Hasty Dispatch Dyspo to recycle our super combo, Zen-oh, edge of Space. 

SS Gotenks, Absolute Unison: I look at this card more of a Barrier Deflect Alternate Finisher with Removal or Draw engine. It fits nicely as a two off and your opponent must deal with since they don’t want it to stick for multiple turns. 

Hit Deadly Vanguard: I don’t know if it’s just me but Dimension Magic seemed to be gotten worse with Set 10. The main reason why is the ability to play free counter play’s when the Unison is on board (SS Trunks, God-Sealing Technique). However, I added 2 of these just so the you can get value off your extra energy since there are a lot of times that your defensive energy gets wasted. 

Soul Punisher: Making your leader a double strike crit for 35k for 1 energy is the definition of “DEECE”! Also, it fits in the conversation of utilizing your defensive energy wisely. 

Vegeta, Savior of the Future: 1 Cost double strikers are super important in this meta to deal with opposing unisons and you need a clear way to awaken. It’s a match made in heaven! You could potentially cut 1 to make the deck 51 cards. 

Secret Rare: You can either go with Black Smoke Dragon or SS4 Gogeta. I think I like Gogeta more since he has the ability to close out the game that turn whereas Black Smoke Dragon usually needs a second activate main skill to resolve to turn the corner. Fu, Shrouded of Mystery acts as another secret rare. When your opponent is at 2 or less life and you use the activate main skill so they can only use 1 counter for the turn, when you bait out the negate FU Shrouded or SS4 clears a path  to victory! 

Conclusion 

If you’re looking for a super fun deck to play at locals, this is the deck for you. It’s not tier 1 by any means but it does do something powerful meaning it’s a blue leader that utilizes the drop area. For the next SOL deck, I’m going to tinker with Warp Lands with Zen-oh Unison and SOL to utilize the activate main ability. Stay tuned!