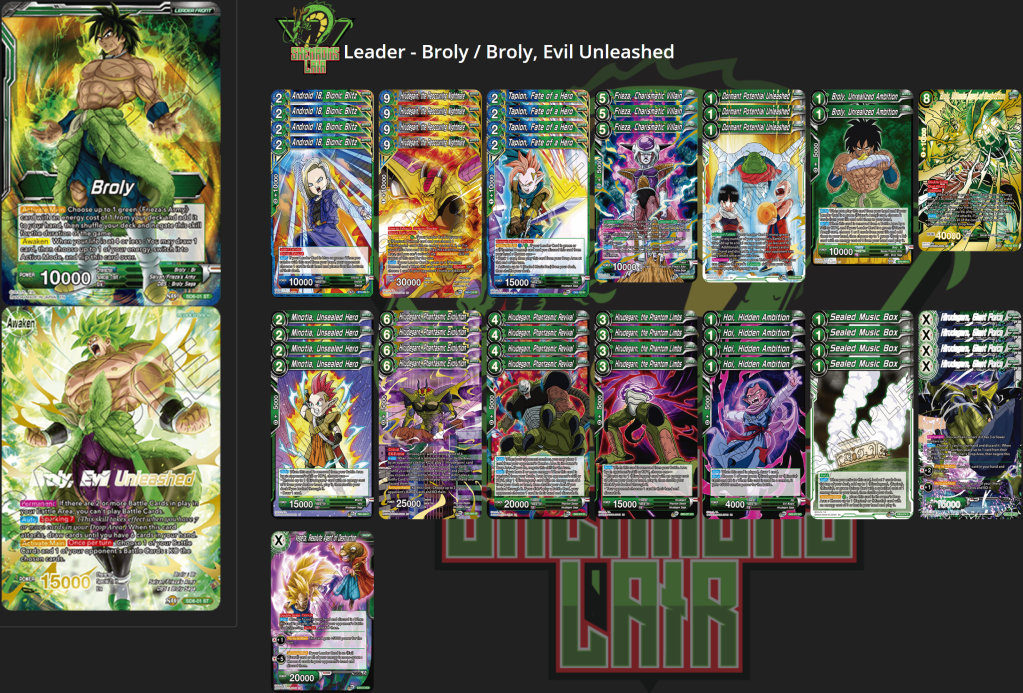
FINALLY!!! We can brew some sweet decks with some new crads!!! There comes a time every set where new cards are released and you then have to look back on the past to see if there are any old leaders or cards that best synergize with the new, shiny things. This time around, Broly//Broly, Evil Unleashed answered the call.
The Jams
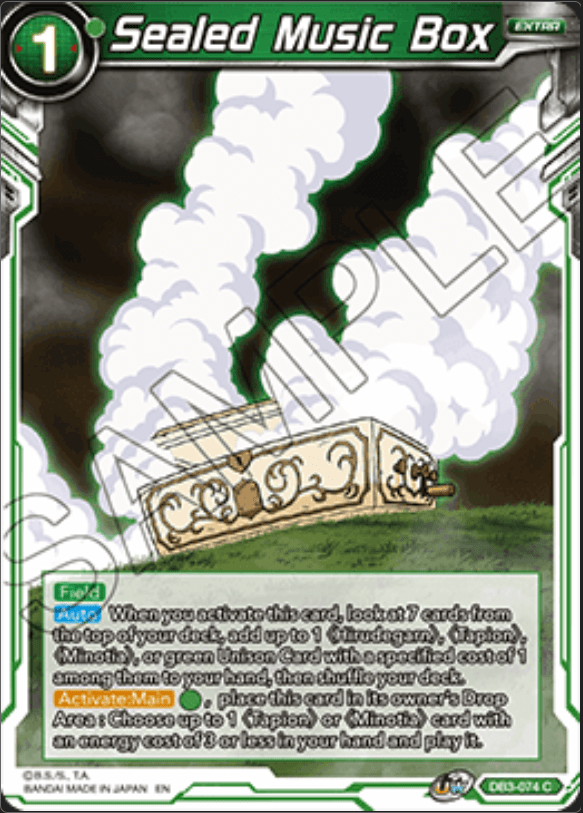
Music Box is the JUICE. You search the top 7 for basically whatever you want, including a 1 drop Unison, and then you have an [activate: main] for (G) that allows you to sacrifice it to play a Tapion or Minotia (Usually, always Minotia). This is the start of your engine.
The Pieces
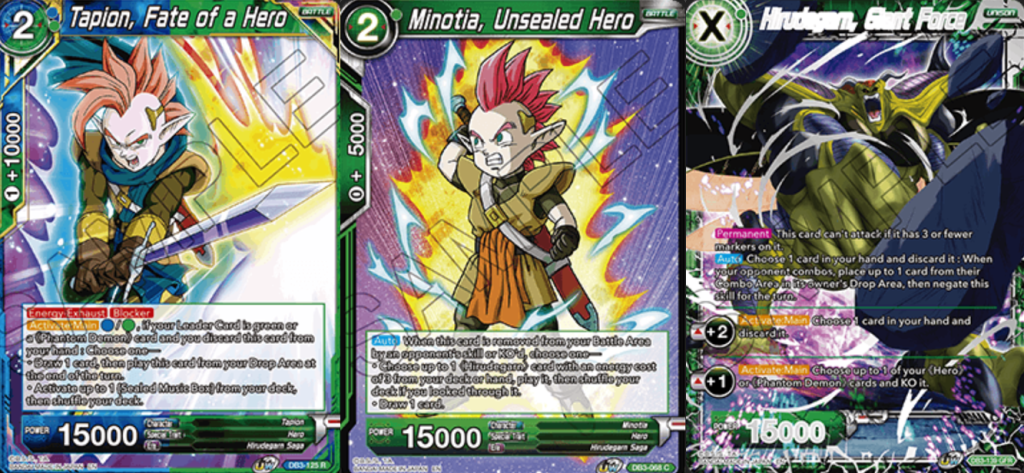
Tapion, Fate of a Hero fills a few roles – copies 4-8 of Music Box, a blocker/cantrip, and additionally can be discarded to trigger revive on 9 drop Hirudegarn from Db6.
Minotia, Unsealed Hero is truly the hero – as stated above, you’re going to sac your Music Box for Minotia always in order to start your chain.
Hirudegarn, Giant Force is, aside from your leader and Hoi, the most consistent enabler in the deck.
Sweep the Leg
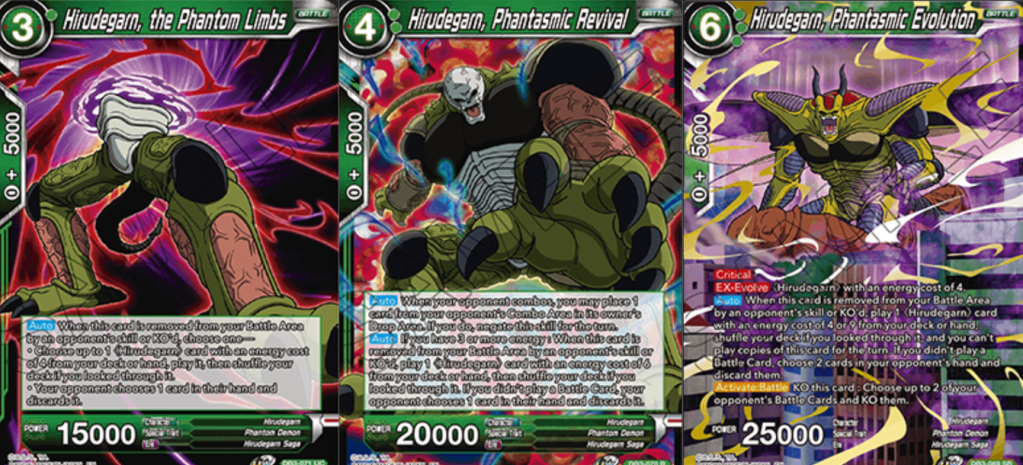
Once you sac your Minotia, you’re going straight into Phantom Limbs who can again be removed or KO’d to take you up the chain.
Hirudegarn, Phantasmic Revival then comes down and has an [auto] that allows you to disrupt the combo step, and additionally again can be removed or KO’d to go up the chain again. The caveat here is that you need 3 or more energy for this effect.
Hirudegarn, Phantasmic Evolution is SNAPPED. 25k Critical that can EX-Evolve for free on top of the 4 drop, and then when it is removed or KO’d lets you go back into a 4, but more importantly go into the 9 drop from DB6. The thing that really puts it over the top is the [Activate: Battle] to KO it, allowing you to go up the chain, or make your opponent discard to cards, to then KO up to 2 of your opponent’s battle cards… [ACTIVATE: BATTLE]… RIGHT!?
ReoccurringNightmares
Hoi, Hidden Ambition is a messed up card. The ability to enable your chain on both players’ turns through the combo step is absurd. This sets up some pretty gross plays where you have a 4 on board, with 3 energy on the opponent’s turn. You can then combo Hoi, sac the 4 drop, go into the 6, [Activate: Battle] to KO it and then KO 2 of your opponent’s battle cards, and then go into the 9 drop!!! BUSTED!!!
Of course we have Hirudegarn, the Reoccurring Nightmare which is finally the [Revival] payoff we deserve. Whenever you activate blocker your opponent will have to discard a card, and of course once it gets revived you can activate it again for some top tier defense.
Lastly, we have Ultimate AoD Broly SCR that is EASILY played in this deck due to all of the enablers. The perfect ending to the biggest hit single of ALL-TIME!!!
Conclusion
For the casual/competitive, Johnny players out there… this deck is a club banger. You have nearly flawless synergy with the leader and the engine and a deck that dodges the majority of counter: play within the format, which is huge. For those looking to make the most out of the Giant Force release, this deck is a great investment for both the kitchen table, and even some competitive events as well!
Look up user “McFly2015” on Shenron’s Lair for all lists!!!
A lot of talk has been hitting the boards since preview season began about Dark Broly and what its place would be in the upcoming format. The deck is incredibly fun and ends up being quite rewarding for the pilot; so much so, the skill of the pilot can take the deck from the depths of tier 2 up to tier 1/1.5, depending on the match-up spread across your Swiss rounds.
Why is this Deck Fun?/Why is it Worth Playing?
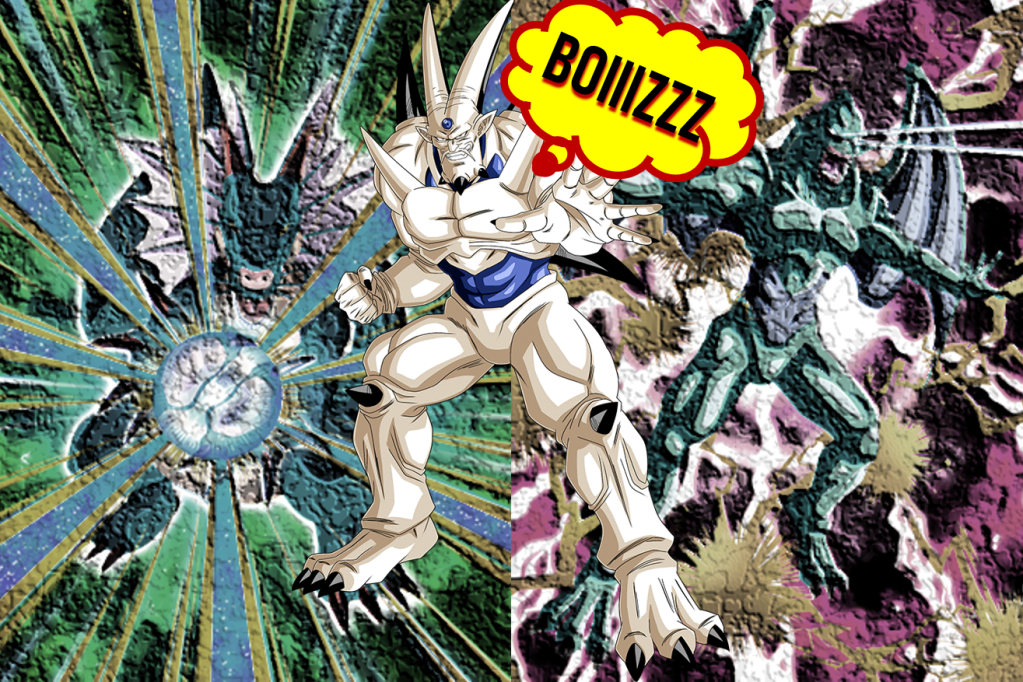
To shed some more light on why this question matters, it is important to shed light on the fact that my new way of engaging in the DBSCG in paper form relies on me finding a single deck from the newest set and it being my go-to for the duration of the format. Additionally, I also am in the process of selling everything else that doesn’t really appeal to me. In series 10 that deck was Syn Shenron. I love how smart that deck makes me feel and how minor deviations in decision making and deck building leads to results in given match-ups. I also enjoy how it has a true end game with the YYYYYY ability on the awakened side to summon the dragon boys! Lastly, the Shadow Dragon Saga is by far one of my most favorite of all-time in regards to the Dragon Ball franchise.
In series 11, the deck I chose ended up being Dark Broly. It certainly isn’t the best by any means, but I truly love decks that allow me to manipulate multiple zones during a game. I feel it gives my decisions more weight, even just the decision of playing 27 or more 30ks vs 26 or less (the choice is always 27 or more btw). I enjoy the ability to make slight deviations based on a given match-up to gain value that all adds up to me trying to win the game. Dark Broly offers all of that and more!
***Thanks to recent pricing, I have also foiled both of these out :)***
The deck has an engine that is easy to assemble, but early on in your games there are a lot of decision points that get created based on the opponent – when to take life with your leader skill, do I lead on Towa to get a 2nd ball, how do I properly play around X, how do I make what my opponent is planning to do worse… the list is seemingly endless with this deck. The sequencing also is really important on your turns because you’re constantly trying to dance around landmines while giving your opponent the least amount of information possible.
Priorities– Towa, Union of Magic and Science/Savage Rush
When you’re creating your initial lists and playing your first games, it becomes fairly clear that the Union of Magic and Science is one of, if not the, most important cards in the deck. Due to your leader skill allowing you to see extra cards and set up your drop area, it is way more important to have Towa + Ball on turn 1 than it is to have Savage Rush on turn 1. Additionally, this also impacts the way I tend to mulligan. If my opener has a Towa and/or Savage Rush + Ball, I will keep those cards plus any card that isn’t a 30k in order to optimize my flips off of the leader’s front side skill.
When to Play New Masked Saiyan, Berserker, and Realm Ravager
New Masked Saiyan – first one down against aggro/aggro-mid, also acts as the last one you play each turn once the engine is online. Don’t forget that once awakened you can activate blocker and then to get full value you can combo it even with it in rest mode.
Berserker – usually the last one to come down, unless there is a threat that needs to be addressed in the moment.
Realm Ravager – first one down against mid-range/control-mid. Also, has the most utility against decks that interact with their drop area – Gogeta, Gotenks, Dredgeku, Syn Shenron, etc.
Towa, Dark Aura Deluge – “Toolbox”
When first reading this version of Towa it is really unclear how it is supposed to impact the deck’s overall strategy. That is until you realize it serves as a toolbox for any 30k battle card you could possibly need in a moment’s notice. The ability to clear away something that is non-essential in exchange for the perfect card in the moment is what grindy, mid-range decks dream of. That is why we can afford to play 1 of’s like Mira, Assault from the Skies and SS4 Bardock, Combat Instincts as additional, reliable ways to close various types of games. SS4 Bardock/hand destruction ends up being a solid plan against a lot of the closer to “fair” archetypes within the format – so having access to it at a moments notice is wildly impactful. The same goes for times where you need a hyper efficient double striker to pressure the opponent whilst still enabling yourself some defense with Mira. Lastly, we can buy back Brainwashed No More to help stave off decks that are trying to kill you with one giant attack.
And with DB6, Giant Force, we will have the new Demigra Over Realm – in testing already the card is ABSURD.
DON’T CUT THE UNISON
I have been seeing a lot of comments on the deck and some folks have been cutting the Unison completely – do not do it. The Unison fixes a lot of the deck’s worst draws and also creates a lot of pressure on the opponent that they aren’t even aware of if they leave it there. It combining with your leader ability to bring 5 cards back from warp is exactly what this deck wants to be doing. Your drop area acts as not only your second hand, but it also acts as your resource engine as well – and don’t forget the toolbox you have with Towa. The Unison is also a great way to play around counters and floodgates when you’re trying to go for game with that FDC in your hand. Lastly, the -4 is DEVASTATING.
Conclusion
Play the decks you enjoy playing and enjoy Dragon Ball the way you want to. We often get too bogged down by only focusing on the most competitive aspects of the game, but there truly is so much to explore and enjoy. Be smart about purchasing cards and don’t overextend yourself trying to collect all of the top decks, including promos. There are answers to virtually every top deck which is really refreshing. Honestly, there seems to be a lot of ways to pivot in the series 11 environment, so enjoy it while you can. Lastly, you can expect some DB6 brews popping up reaaaallllll soon!!!
Vermilion Bloodlines has certainly delivered a number of new power house archetypes that all have format changing implications, but with just a handful of cards being spoiled the Shadow Dragons archetype received even more juice allowing it to maintain its tier 1 status. In fact, the crux of the deck was that you had a lot of filler slots and overall the deck needed to have Ball 1 on turn 1 to create its most optimal lines of play, this set fixed both of those issues.
***Shout-outs to Chris Welch for making both “Boiz” and “The Juice” some of the most used phrases in my repertoire***
As you have all read, hopefully, by now overall deck consistency and the ability to execute your game-plan as quickly as possible is the key to success in this upcoming format. Game 1’s are more so decided by who establishes their engine first, versus the old formats where it really came down to adjustments in the middle parts of the game and who drew their more powerful cards more often.
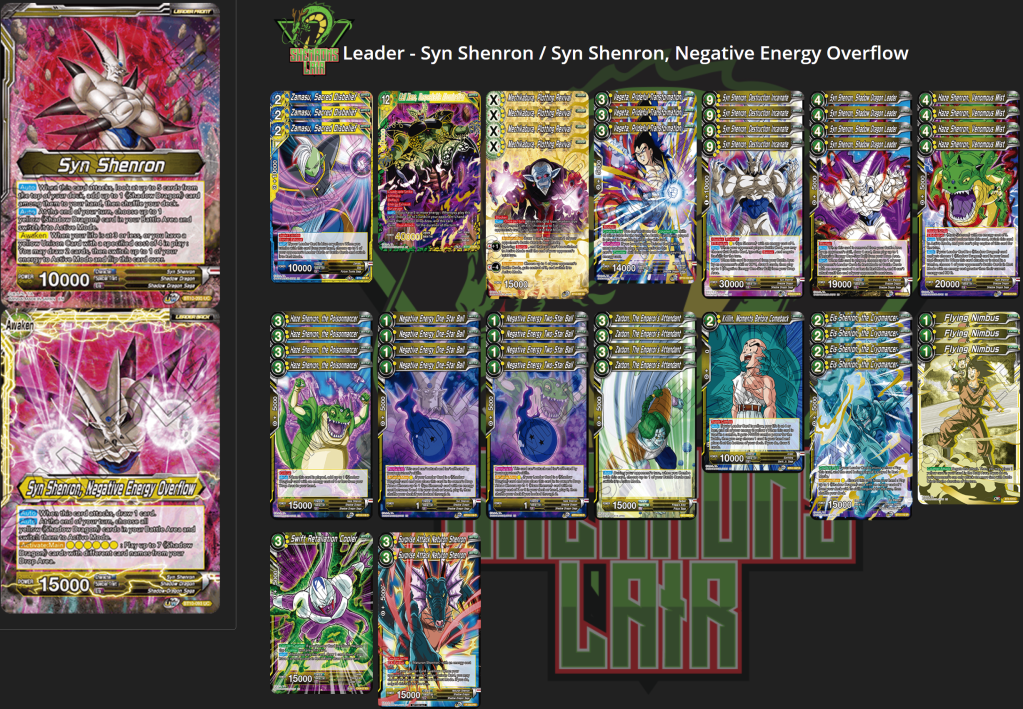
Syn Shenron was a powerhouse in series 10 due to its ability to punish the fair decks, whereas the fast decks truly could punish a draw where Syn Shenron didn’t open ball 1. This changes with the release of series 11 and the introduction of Eis Shenron, the Cryomancer. Eis Shenron is a card that provides 2 modes: he either acts as a more expensive Crusher Ball or, more importantly, you can use his [Activate: Main] to pay a yellow, discard him, and then play a Shadow Dragon that costs 1. This means that now your deck contains 4 additional copies of whatever ball you want for a single energy. We all know the deck needs ball 1 on turn 1, and now we have 8 copies to mulligan for to get our engine online.
Overall, the Naturon and Eis Shenron cards don’t match the power level of Syn and Haze so it is hard to justify devoting more slots to them, instead I run 2 copies of the new promo, Surprise Attack Naturon Shenron, as an additional dragon that we can revive that can be impactful both offensively and defensively if we’re forced to pass the turn back.
Sideboard Considerations
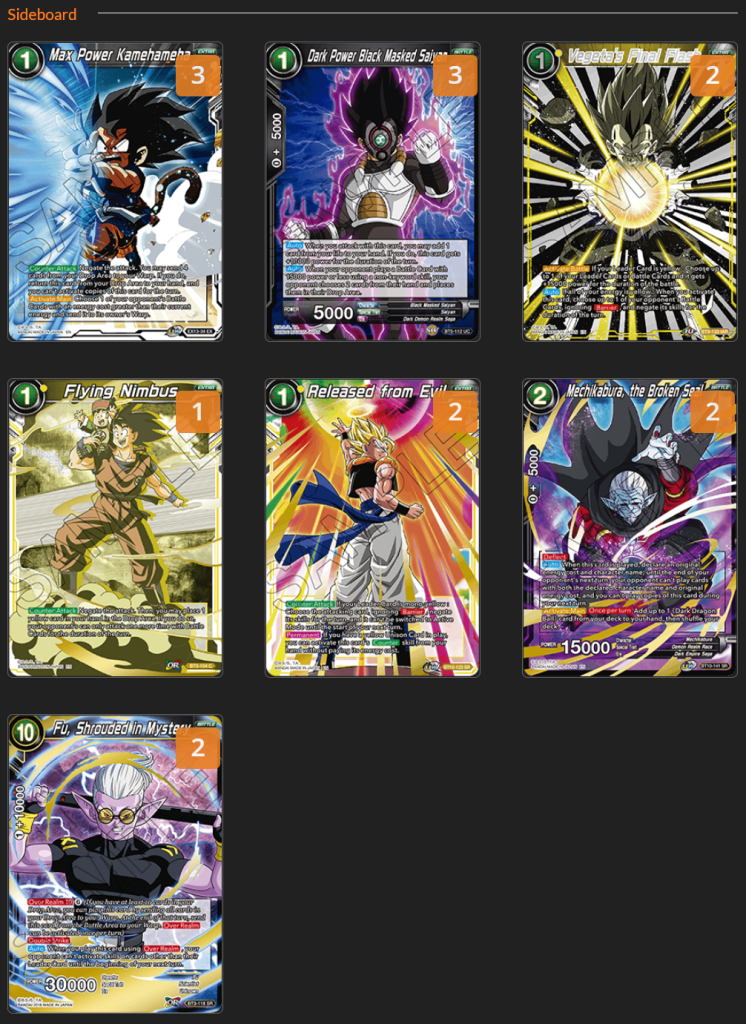
3x Max Power Kamehameha – Gotenks and Gogeta: Br match-up 3x Dark Power Black Masked Saiyan – Vegeks and Red Broly: Br, Obuni 2x Final Flash – Invoker, Gogeta: Br 2x Released from Evil – Reboot Gohan, Gogeta: Br, Red Broly: Br 2x Mechikabura, the Broken Seal – Invoker, Blue, Gotenks, & mirror 2x Fu, Shrouded in Mystery – Invoker & mirror 1x Flying Nimbus – Aggro
VS Gogeta: Br
-2x Naturon Shenron -1x Swift Retaliation Cooler +3x Max Power Kamehameha: to kill Gogeta 6
-1x Mechikabura Unison -1x Flying Nimbus +2x Final Flash: to turn off Gogeta 6 and combine with Haze Shenron
-1x Vegeta, Prideful Transformation -1x Eis Shenron +2x Released from Evil: to turn off Gogeta 6 when we need to protect our board
VS Red Broly: Br
-2x Naturon Shenron -1x Swift Retaliation Cooler +3x Dark Power Black Masked Saiyan: to counteract Vampa and free playing Ba/Paragus
-1x Mechikabura Unison +1x Flying Nimbus
-1x Vegeta, Prideful Transformation -1x Eis Shenron +2x Released from Evil: to turn off Swap
VS Vegeks
-2x Naturon Shenron -1x Swift Retaliation Cooler +3x Dark Power Black Masked Saiyan: to help counteract free play
-1x Mechikabura Unison +1x Flying Nimbus
VS Invoker
-2x Naturon Shenron +2x Mechikabura, the Broken Seal: [Deflect], can keep them off of their finishers to delay the game
-4x Zarbon +2x Fu, Shrouded in Mystery: to close the game once we delay it with Mechikabura +2x Final Flash: the ability to turn off Invoker on an aggressive turn
VS Blue
-2x Naturon Shenron +2x Mechikabura, the Broken Seal: to keep them off of Obuni, Turning the Tide, and Baby 5
-1x Zarbon -1x Eis Shenron -1x Vegeta, Prideful Transformation +3x Dark Power Black Masked Saiyan: to keep them off of Obuni
VS Reboot Gohan
-1x Mechikabura Unison -1x Vegeta, Prideful Transformation +2x Released from Evil
-1x Eis Shenron +1x Flying Nimbus
VS Gotenks
-1x Naturon Shenron -1x Eis Shenron +2x Max Power Kamehameha: additional way to handle Gotenks 6 and keep them off of Successor 12
-1x Swift Retaliation Cooler -1x Naturon Shenron +2x Mechikabura, the Broken Seal: keeping them off of Gotenks 6 at any point in the game derails what their deck needs to do
Conclusion
Ultimately, I am very excited for where Syn Shenron sits heading into the upcoming format. The deck is linear but with tons of room for the pilot to adjust to a given match-up, has the ability to make changes post board without sacrificing consistency, and overall checks all the boxes in terms of power level when compared to the new decks coming in. I am also excited to see your thoughts on the list, sideboard considerations, and your own match-up experiences with the deck. Happy testing <3.
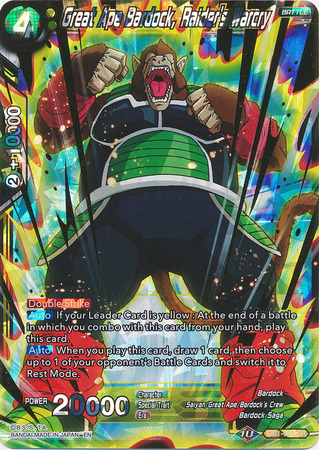
With Draft Box 4 came the introduction of, for the time, the best battle card the game had ever seen. Great Ape Bardock, Raider’s Warcry offered a two energy, 20k double striker, that tapped something, drew a card, and was played during the combo step which at the time would take yellow from not only the best color in the game, but instead the most oppressive as time would continue on. Yellow Broly leader would be errata’d, but then shortly after the release of Series 8, Surgeku would be released and the game would never be the same… until the introduction of Series 10.
Unisons and Scaling
With the release of Rise of the Unison Warrior came a new normal – being on the play, with a Unison was the best thing you could be doing. A Unison basically has Deflect and Barrier, and once on the field provides additional actions per turn, virtual/actual card advantage, a threat that requires multiple efforts to be dispatched, and they enable free interaction. This amount of value for your energy is unlike anything we have ever seen in the Dragon Ball Super Card Game, and with this new shift in scaling at the two energy slot Raider’s Warcry went from being good all of the time, to being good in very specific spots: turn 2 on the play and turn 2 on the draw if your opponent doesn’t have access to removal. Even then you’re going to point your Warcry attacks at the opposing player’s Unison, which allows the game to continue on longer and cause it to be out-scaled anyway. Lastly, Unisons have also made the combo step more difficult to prey upon as your opponent can remove your ability to combo entirely by pointing their attacks at your Unison. You of course have the option forgo the use of Unisons, but see the point above where I talk about how much a Unison is worth compared to a Battle Card.
The Increase of Powerand Losing Tempo
Alongside the introduction of Unisons making the application of Raider’s Warcry much more narrow, the card in general has become much worse on defense due to how powerful battle cards are becoming earlier in the game. If your leader is unawakened and facing down a 20k attack, you’re having to combo Raider’s plus an additional card to defend the attack. Yes, Raider’s will replace itself but as you’re aware, the minus 1 over time always takes a toll as the game continues to scale; let us not forget the introduction of an entire archetype built around free 30k’s heading into Series 11.
Along with that increase of power causing Raider’s to be worse, the game is becoming much more tempo based. Not doing something powerful on your turn for a chance to leave up two energy for Raider’s Warcry is such a feel bad in this new world. Just think about how energy intensive and powerful these new archetypes have ended up being, and now think about ever leaving up more than 1 energy on your turns… it feels so bad. 1 energy has become so powerful due to the introduction of floodgates and tapping out with a Unison while holding up a free counter: play is just so much better than leaving two open or actually committing to spend that two energy on an ape.
The Power of Negates and the Need for Floodgates
Above we referenced the increase of power when it comes to Battle Cards, this simple fact has led to a higher reliance on negates as opposed to the combo step to stave off attacks. In fact, if a player combos multiple cards as opposed to negating the attack it is actually a sign of weakness that the opposing player will then prey upon. With the increase of negates, combined with the impact of Unisons, the overall number of combo steps is drastically reduced; this makes Raider’s Warcry a huge liability.
With the importance of negates skyrocketing, and the new, powerful engines producing an abundance of huge attacks, floodgates become a necessary evil. A floodgate for 3 or less energy is just so much better than trying to leverage a Raider’s Warcry to potentially stop an attack or two; it just isn’t good enough in the world we live in now. Why just stop a small number of attacks when you can stop an entire turn? There is honestly no reason to try and leverage your two energy in a fashion where you’re only taking small steps when you need to be taking leaps.
The Original Raider’s Warcry
Not the same card by any means, but Goten was once the best Battle Card in the game; so much so that he was added to the ban list during the time of “Storm”. With the recent unbanning of Goten a lot of players have already began to start brewing new decks featuring Successor of Hope, Adoptive Father Son Gohan, Goten, etc. I even joined in by testing Goten with Galactic Frieza leader from series 1 so that my Goten would have built-in protection. The data from the games played produced the result I had expected: the deck and the cards you’re forced to play get out-scaled so ridiculously fast by any deck playing new cards. I know that playing with Galactic Frieza isn’t exciting, but even if you port over the cards into yellow Gotenks you’ll run into the same scaling problem.
There is hope in some brews I have been seeing with Reboot Gohan leader that try to mimic “Storm”, but ultimately those decks will fade away due to the information we have gone over here today. Shout-outs to the folks in our discord for some neat lists. Be sure to check out the contact page so you can join if you haven’t already.
Conclusion
It is so important now more than ever to pay attention to the details of your testing. Games have the ability to scale so fast that every energy and card used on a given turn needs to be given additional thought. Deciding what to charge, what play to commit to, how much defense is needed, and what your opponent can do require more attention now than they have in the past due to the power level increases. In series 10 games on average would be decided by turn 4.5/5, in series 11 it is looking closer to 3.5/4 which is quite a difference if you really begin to think about it. To clarify a bit, I am speaking of the turn in which a game starts becoming overwhelming tilted to one side, not necessarily when the game is actually over. Take sometime over the next few weeks and try to spend more time on these more micro types of decisions, I am certain it will do a ton of good in your overall development heading into the release of Vermilion Bloodlines. Happy testing ❤
Spending 3 straight days testing series 11 with Frisco and Jose did a lot to not only uncover some truths within the format, but additionally it radically changed how we would have to approach deck building due to the massive engines included within Vermilion Bloodlines. Not only that, but certain cards and ways of thinking just weren’t good enough anymore as we got deeper and deeper into testing. What I am about to talk about today is certainly something I have always been guilty of and I am certain others can relate as well.
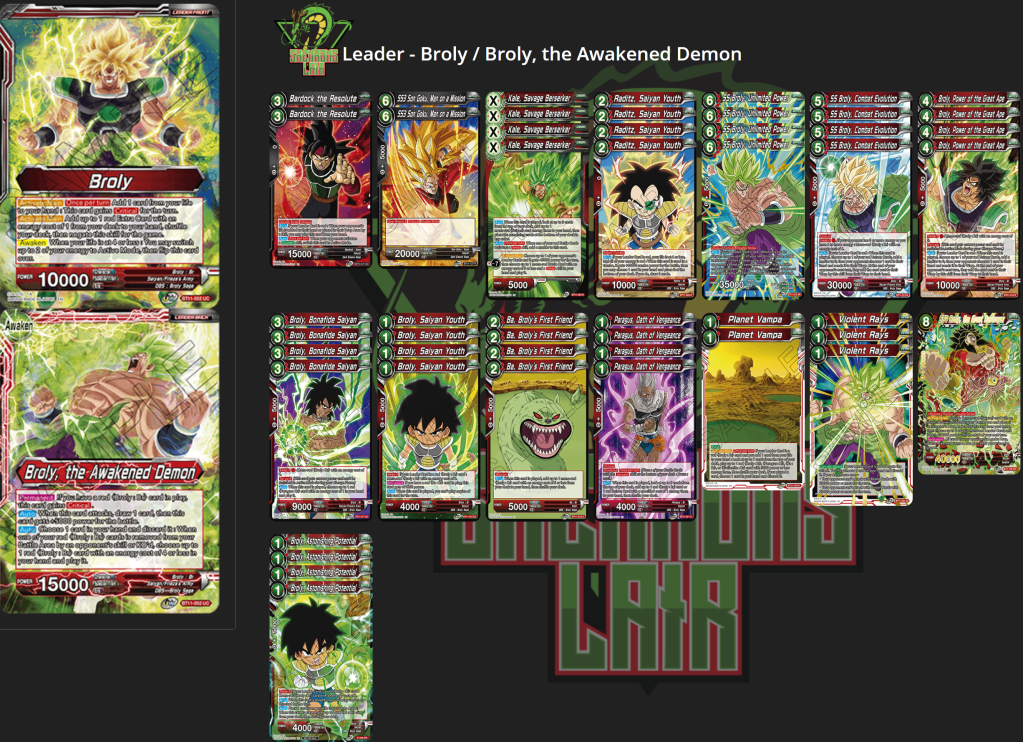
At the time this article was posted, https://3xgproductions.com/2020/08/18/vermilion-bloodlines-broly-returns/, the promo Broly 1 drop had not been previewed, I tested limited games, and ultimately felt I knew better based on the games and match-ups I was playing. I was dismissive of Planet Vampa at the time, and ultimately I tried to be smart and more correct, when in fact I was wrong. The best part about going into a testing environment with others is that you get to start over, and now that we had everything previewed we could see how all of the pieces were moving together, so I went back to the basics – 4x of everything important with a hyper focus of mitigating any and all possible points of failure. This is where I ended after the weekend:
As you can see, there are only 7 slots ultimately that became dedicated to me being more “creative” or “smart”. I have seen builds that go further with creativity by reducing chain pieces, Unisons, etc. but in all of my experience the most powerful thing I could always do was try to abuse the Broly chains as often as possible. Sure, you could try to invest some space into Toppo, but if you leave 2 energy up on a turn, you probably lost already. You could add FDC, but is it better than using that energy to progress your chain? It is debatable, but when my mindset is “I always want to do this” then that means my deck needs to be focused on doing so. My plan to express creativity will come from the sideboard, but for the main deck I am all good on pulling off Broly more than you can/will.
3x Max Power Kamehameha for the Gogeta: Br match-up (great against Syn Shenron too) 3x Crown of Retribution for Blue match-ups to play around God-Sealing and other counters 3x Beerus Ball to counter Heroic Prospect 3x Unending Awakening in match-ups where there are more 15k attacks than 20+ 3x Toppo, Righteous Aid for the Vegeks match-up
Broly happens to be the easiest, most extreme case due to it being a Series 11 deck, but how do we apply this same logic to a deck from the past to something like… Dredgeku?
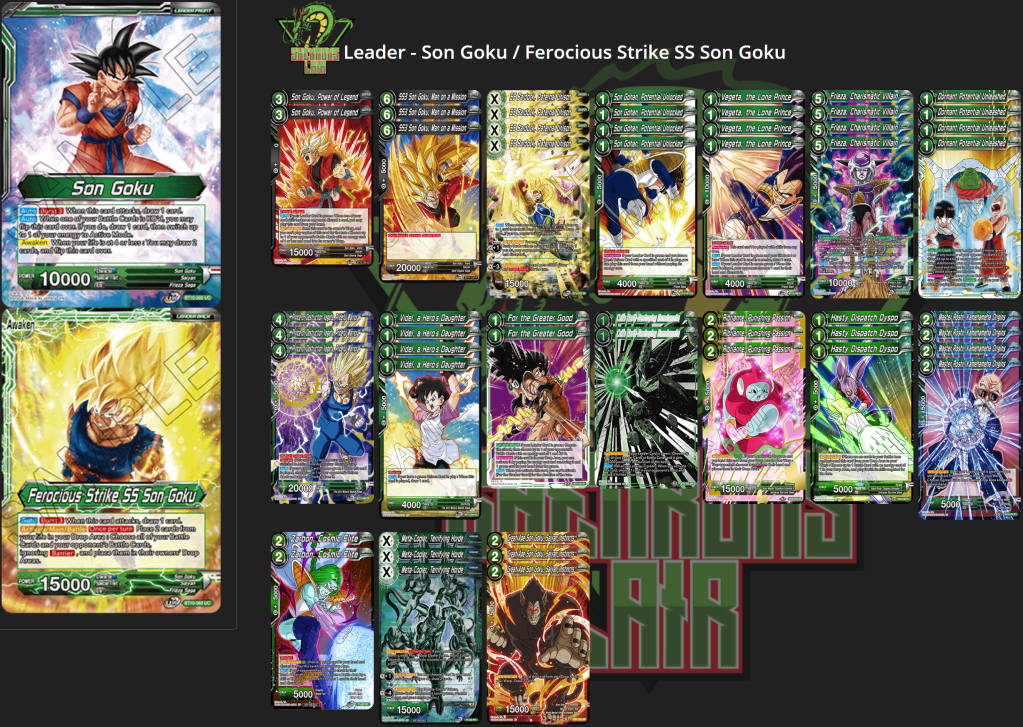
Arguably the most underplayed archetype in Series 10, Dredgeku, only got better with the release of Series 11. In the previous environment lists were stretched thin to account for everything and provide enough versatility and power to be able close games. In series 11 though we have the ability to trim away all of the fat and finally get this archetype in a place where it plays an entire deck of good cards and is completely focused on maximizing every slot.
54 cards and I really don’t want to increase it at all. Dredgeku has always been the best deck when it comes to utilizing Unisons, so why try to dilute that? Additionally, I know that To Save a Hopeful Future was a cute package you could play, but why invest all of those slots when you have the new Lebron James of DBS with Prince of Destruction Vegeta, Prideful Warrior – he does it all!!! When you look at this deck list now as compared to lists from the past you can clearly see what this deck is trying to do: establish a Unison, tax your resources, keep the game close, and then use some combination of Bardock, Man on a Mission, Cooler, or Lebron to close the game. Is there some creativity here? Sure, but honestly not a lot. Instead we’re focused on what makes the archetype so good. Again we will flex our creativity a bit when it comes to approaching our sideboard:
1x Cooler and 3x AoD Unison for the Syn Shenron match-up 3x Max Power Kamehameha for Gotenks, Gogeta: Br, and Syn Shenron match-up 3x Dark Power Black Masked Saiyan for the Vegeks match-up 1x Ribrianne against Syn Shenron and other match-ups where you want to lean into discard more plus bring in AoD Unison 1x Saiyan Instincts for any more attrition based match-up, green mirrors, etc. 3x Arena Wrecker is great against Invoker and can be brought in against Broly: Br for added pressure/disruption
Conclusion
The biggest change from series 10 to now for me has been getting away from the old ways of thinking and instead focusing on trying to maximize the best attributes of every leader and archetype I work with. Instead of trying to force a deck into being something it isn’t due to my own biases, I instead try to lean as hard as possible into enabling the deck to be at its very best doing the most powerful things it is capable of, as much as possible. Of course as we start receiving more meta game data, we will start adjusting, but for now our focus has to be on truly maximizing these more competitive archetypes – Dont’ Get Too Cute, because ultimately with the release of Vermilion Bloodlines you’re going to be heavily rewarded for consistency in your deck building, as opposed to creativity and flexibility.
As the 3xG #scrubfam is aware, Frisco, Jose, and myself spent an entire weekend together messing around (pause) with all of the cards spoiled from Vermilion Bloodlines, and even adjusted as the new SCR’s were revealed by having access to Jose’s printer at home to get them printed to test with the moment they were revealed. Huge shout-out to Frisco getting the proxies together and another to Jose to using his work printer to get the entire set printed, and of course for being the most *accommodating* host (tilt). I can tell you that playing paper games felt so amazing and having all of the proxies ready to go made our weekend super easy and incredibly fun.
Decks we Tested
SS4 Vegeta Red Gogeta Red Broly Dark Broly Vegeks Invoker Dredgeku Syn Shenron
I posted some of the lists on the Facebook group, but for sure will be diving into them in the coming weeks so you all can see what these decks looked like over the weekend and where our heads are at heading into this new environment.
The best way to truly articulate the way this format is going to look is to first look at the two decks that, quite honestly, demonstrated the highest power level overall over the weekend: Red Gogeta and Red Broly.
The first thing that stood out about these decks is just how damn good they were at ALWAYS doing their thing. I know in previous weeks I worried about the consistency of Broly, but the promo 1 drop truly CHANGES EVERYTHING! Vampa went from being medium to absolutely snapped, and awakening turn 2 went from being a detriment to being incredibly powerful. Not to mention the overall power level of Kale Unison skyrocketed. I digress – ultimately these decks instantly became the pace setters for the rest of the decks we were playing due to their combination of overall power level plus consistency.
Gogeta operates in this space where since it has such a high level of consistency both the pilot and the opponent know for a fact that Gogeta 6 is always coming down on turn 3, this then shapes the way the entire game is forced to play out before both players even start playing. If we operate under this assumption, this means any deck that is less consistent, nor has an answer for what Gogeta is about to do is immediately removed from being within that tier. Broly is faster, just as consistent, but much more susceptible to floodgates stopping them from closing the game in time – but the opponent HAS TO HAVE IT, or they die.
As I begin to look back on older deck lists from when previews began, and even ones that folks are posting now, you can definitely see them viewing the games from a much different lens, one that honestly won’t age well into the series 11 environment due to the above powerhouses that completely shift the way that games will be played.
Do Something Powerful First, Then Stop Their Turn
When Vegeks was at the peak of his powers we often talked about how the series 10 format was defined by the floodgates available, well it seems that is the case again here in series 11, but there is a caveat to that – your deck has to also be doing something powerful and consistent enough to be able to compete turn by turn and punish the opposing player when you get the chance to stop them for multiple turns.
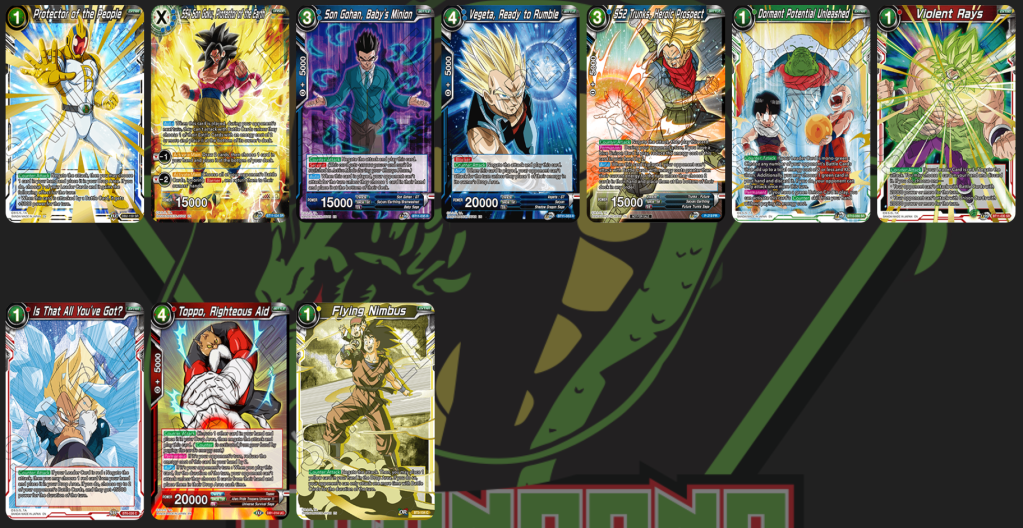
As you can see, there are a ton of options when deciding on what floodgates to play, the tricky part becomes choosing which ones and how many to play of each without diluting your deck’s core strategy too much. Don’t forget, Blue has Baby Hatchhyack SCR as well. If I had to rank them in any particular order:
1.) Baby Hatchhyack – stops everything, costs 0 + a card 2.) Dormant Potential Unleashed – sometimes costs 0 + a card, reduces the amount of attacks to 2 3.) Violent Rays – costs 1 + a card, conditionally can stop all but the leader and Unison attacks 4.) Heroic Prospect – costs 1 with Unison, counters are easy to access, conditionally can stop all but the leader and Unison attacks 5.) Flying Nimbus – costs 1 + a card, reduces the opponent to 3 more attacks if they control a Unison and didn’t swing with the Unison or Leader first 6.) Toppo, Righteous Aid – costs 2 + a card, counters are easy to access, opponent can attack as long as they have resources, played early enough it usually stops the turn 7.) SS4 Son Goku, Protector of the Earth – costs 5, reduces the opponent to just a leader and Unison attack if you wipe the board with the minus 2. 8.) Vegeta, Ready to Rumble – costs 4, opponent can attack as long as they’re willing to sacrifice energy 9.) Son Gohan, Baby’s Minion – costs 3, counters are easy to access, opponent can attack as long as they have resources, played early enough it usually stops the turn 10.) Is That All You’ve Got – costs 1 + a card, has a low floor, but high ceiling based on board state 11.) Protector of the People – costs 1 + a card, best against decks with smaller attackers
This means that even beginning to enter this format, you need to be selecting your deck based on the floodgates available to you alongside your deck’s ability to do something powerful and consistent enough to play with these new, more potent strategies entering the fray in series 11. This list of cards along along with the options available has led me down the path of avoiding counter: play cards completely, outside of the free ones, and not playing decks that are trying to go one for one with negates or removal in game 1 configurations. Instead I have been focusing on trying to do something powerful while dedicating between 4-10 slots on ways to derail the opponent’s turn entirely as opposed to just one for one’s.
I hate to reference old games, but Dragon Ball Super’s new pace of playing be reliant on actions/attacks per turn reminds me of both Score and PanZ trading card games. Where when these floodgate cards start to come out the decks also became so consistent and powerful that you no longer could play real blocks anymore, you would just play effects that stopped all attacks or ended combat instead. Why waste time countering each attack or countering/removing the opponent’s thing? You can just stop them from killing you and buy yourself another powerful turn.
Now that we’re starting to reach this space with the floodgates available you have to instead focus on making your deck do its powerful thing 90+% (arbitrary) of the time, then you can begin dedicating slots to addressing the rest of the decks in the format. Play Vs Draw is always important, but in series 11 it is definitely magnified in pre-board games. In game 1 you focus on doing your thing, games 2 and 3 you focus on delaying the opponent a turn or 2 if you’re on the draw, or if you’re going to be on the play you want to make sure you’re still dedicated to doing your thing, but bring in extra help to buy you another turn just in case. Often times you’ll find that this leads to a neat pattern of escalation where tension is just building and each player is forcing the opposing player to have it, then finally it snaps when one player is defenseless and the other player can capitalize.
Conclusion
Though we aren’t so far removed from series 10, we are definitely seeing the pace of games being pushed harder in series 11 which honestly is refreshing. The series 10 format was very fun due to the amount of decks available and honestly series 11 offers a similar feel so far, but with the added speed and tension that the new, more powerful archetypes provide the games all feel much more rewarding when it comes to deck construction, mulligan decisions, and your awareness of certain cards within the format. I for sure am excited for Vermilion Bloodlines to release and of course to provide more in-depth content as the format begins to develop online.
***DISCLAIMER*** Not every game will play out that way and certainly the deck construction from the general population will ultimately decide what games look like heading into series 11, this is just my observation from playing games over the weekend and what seemed to matter vs not matter. Below I am going to give you some quick takes on some competitive decks.
Blue
1.) SS4 Vegeta – the tension created by the leader and the snowball effect of Zen-Oh combined with minimal slots dedicated to floodgates plus SS4 Unison easily bridges you to the late game where you win with Turning the Tide. 2.) SS3 Reboot – probably the best deck for abusing Baby Unison and Baby 5 drop. 3.) Soul Striker – probably the 2nd best deck for abusing Baby Unison and Baby 5 drop. 4.) Baby – good in a format with aggro decks that are leader reliant or that have to commit all of their resources to trying to close a game early
Red
1.) Red Gogeta – not the fastest, but the most powerful and consistent turn 3 deck in the game 2.) Red Broly – fast, powerful, and consistent just can get hosed by defensive draws featuring multiple floodgates
Green
1.) Dredgeku – makes every match-up, aside from Syn Shenron, much closer to fair and if the deck consistently opens a Unison it is primed to win almost any match-up 2.) Gotenks – the best Cell: Xeno deck, it just happens to be hyper linear due to the size of the engine and sometimes Grim Reaper of Justice isn’t good enough (crazy, I know) 3.) Reboot Gohan – falls victim to decks with a plethora of negates and ways to shut down the turn, but Reboot Gohan leader can still win an entire game out of nowhere if the opponent doesn’t have the answer. 4.) Majin Vegeta – same syndrome as Reboot Gohan except the leader has a harder time winning the game on its own.
Yellow
1.) Syn Shenron – the best yellow deck, not close. Against any fair-ish deck Syn Shenron 4/9 just dominates games. With the preview of 2 drop Eis Shenron you’re now playing 8 copies of your best ball which doubled your overall consistency. 2.) Gotenks – if you enjoy playing fair games and need to sleeve up Raider’s Warcry, you play this deck.
Black
1.) Vegeks – the best black deck, and arguably the best deck in the format. Heading into series 11 I would probably play between 50 and 54 cards to be as consistent as possible. 2.) Dark Broly – not the best match-up spread overall, but if we see a downturn in Violent Rays, this deck has a chance to shine. The deck is powerful and rewards the pilot, it just happens to not be fast enough and falls victim to the best cards in the new format.
Multi
1.) Invoker – Violent Rays breathed new life into the archetype and outside of a few bad match-ups due to play/draw disparity if the format falls into a mid-range space, Invoker is setup to do extremely well.