
The Turles hype train has started to gain some steam as we continue to close in on the official release date of Vicious Rejuvenation! Yesterday, we released our deep dive into ACEC and today I want to take sometime to talk about how the Turles deck functions, the card selections made to optimize ACEC, and of course how I think Turles stacks up to the rest of the format.
Looking for the KO
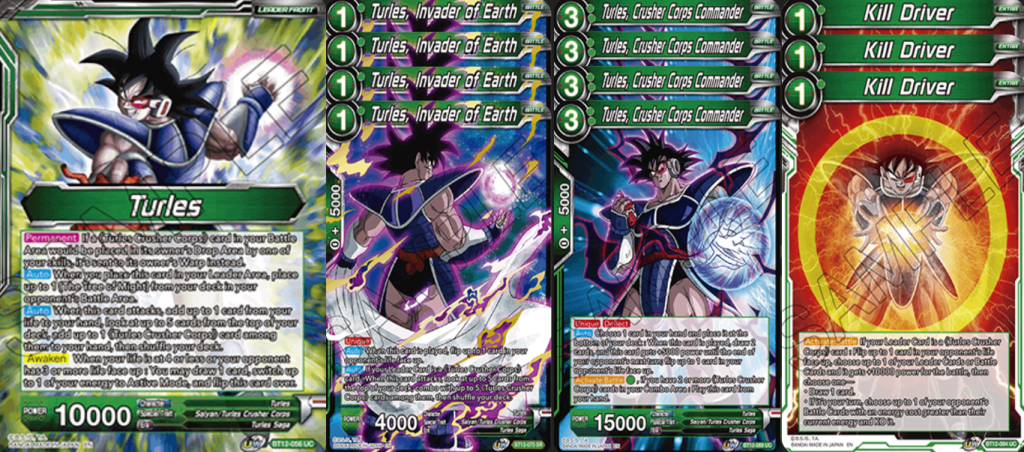
Turles is definitely a fresh archetype when it comes to the introduction of the Crusher Corps alongside the Tree of Might being planted on the opponent’s side of the field to act as your deck’s engine. The truth is, this is basically just a aggro/mid-range strategy that leans on the leader to be the win condition – akin to set 1 Blue Vegeta, Reboot Gohan, etc. The difference is that you ALWAYS have access to your over-statted FDC to get the job done. As the game ramps up and comes to a close you simply become vintage George Foreman looking for an opening to land your KO punch. The twist is, once awakened you now get to choose what life your opponent takes – such a boon in a world where you’re looking to deal multiple points of damage in a single turn to close out the game.
Chapter 1: The Early Awakening
Awakening as early as possible and flipping up as much life as possible in the first couple of turns is exactly where you want to be. Of course it gets tough playing a bunch of cards with Unique, but ultimately the deck NEEDS it in order to start pulling ahead early so that every swing with a Turles card can become lethal as the game winds down.
On the play you have the option to either deploy your 1 drop Turles, play a Demigra Unison, or leave open Kill Driver. Once you pass turn, your opponent will flip one life up, at this point your opponent is either at one life face up, or two based on whether you played Turles on 1, or used Kill Driver. From here you can then swing with Turles 1 drop, activate the auto to combo from the top of the deck, then use the [Activate: Battle] on Turles 3 to play it and then flip the 3rd life face up so you can then trigger the awakening still during the combo step. Once that happens, you’re now sitting at a high life total and have gained access to choosing how you want your leader’s damage to be taken the rest of the game. You also then gain access to the leader’s [Activate: Main] to keep recycling your Fruits from the drop area and ensure you always have one in deck to grab on the opponent’s turn when the Tree triggers.
Going second it gets tricky since you won’t have the ability to trigger Tree on the opponent’s first turn due to the energy requirement. On your first turn you will always swing leader first before playing anything just to gain as much information as possible and to dodge any sort of removal for your 1 drop. You then can play the 1 drop, Demigra, or leave energy open for Kill Driver. Turn 2 once 1 to 2 are face up you then go whichever route you have left available to you to get the 3rd so you get the early awakening.
The early awakening always leads towards your best games, things get complicated when your opponent has the ability to take their own life with various abilities. This is why Demigra is so important – to offer you an easy way to getting to 4 life if that is how you’re forced to awaken.
Chapter 2: The Bois
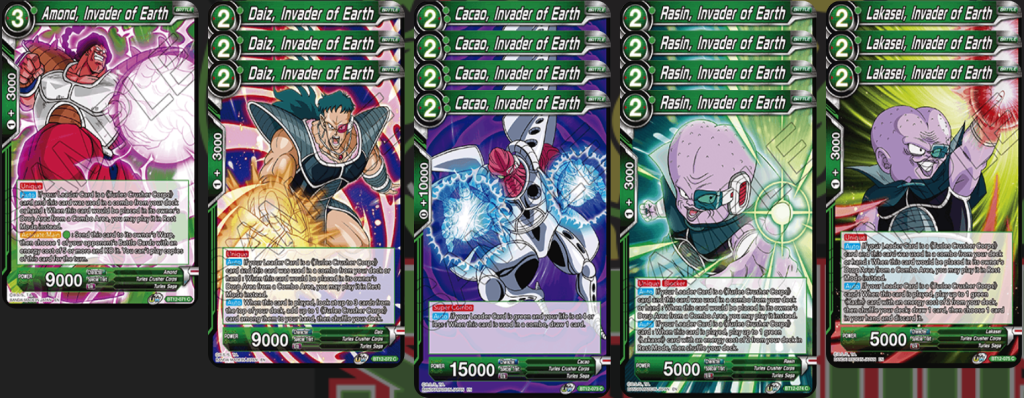
The Crusher Corp offers you quite a bit of value. The fact that they are free bodies that come into play when you combo is already enough upside, but with Lakasei and Rasin you’re guaranteed a Blocker and the ability to loot (draw 1, discard 1). Amond is the perfect singleton since it gives us additional flexibility in our removal suite. Cacao is our super combo and can be found off of our leader skill or Turles 1 drop at any point in the game. Daiz is just a consistency generator that allows us to see more copies of our best cards, including Cacaaaoooooooooooooo.
Chapter 3: Demigra is the Stimulus Package
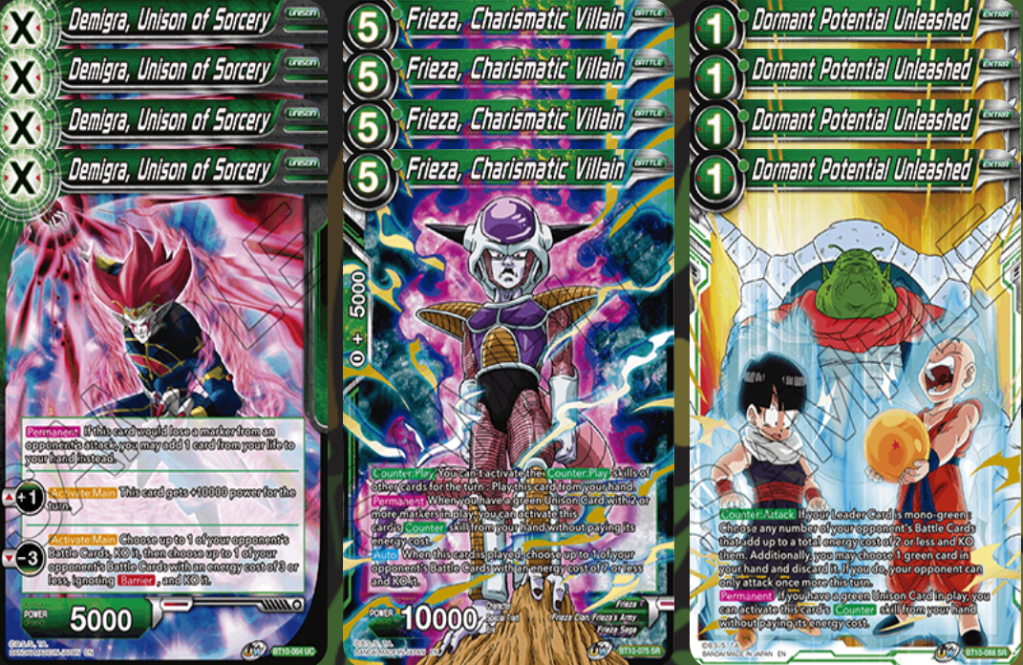
The best 1 drop in the entire game that then enables a source for awakening and the early abuse of the best defensive duo in the game – Captain Charisma and Dormant Potential Unleashed. Demigra is good in every spot and drawing multiples rarely feels bad since in some spots you’re 100% down to just have a hexproof 15k attacker that can’t be countered. Dormant helps us keep games in reach when they have the potential of getting away from us, and Frieza acts as a catch all against any deck reliant on specific cards hitting the battlefield.
There are always other options available for the Unison slot, but as we discussed yesterday it is really difficult to spend your entire 2 to 3 energy on just 1 singular Unison when paying just 1 energy nets you so much more value and opens up more actions per turn overall in those crucial first 3 turns. Lastly, turn 1 Unison into Captain Charisma is just too powerful in a format where Red Broly: Br exists.
Chapter 4: The Sweet Science
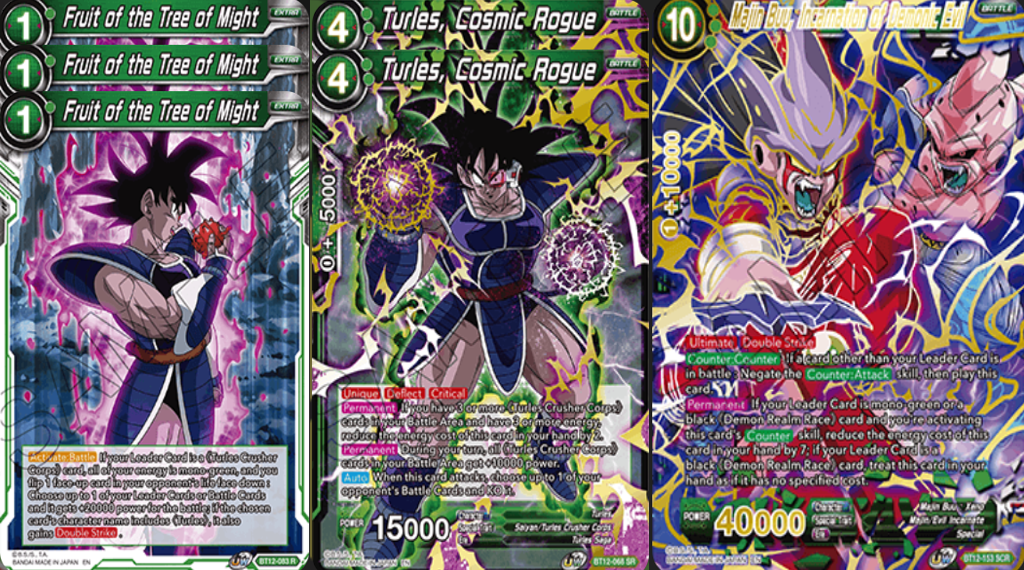
In Turles, you’re never short on win conditions due to the leader’s ability to always have access to Fruit of the Tree of Might. This is our hammer, our Dark Saber, our Mjolnir – you get it. The best part about Fruit is that the [Double Strike] portion works for both your leader and Turles Battle Cards. This means that any 1 drop, 3 drop, or 4 (in rare occasions) can threaten lethal damage – this is exactly how the deck gains the advantage and wins. The opponent has to worry about every Turles swing, which means all of their resources become devoted to stopping it from happening; and of course once a swing does go through it is way too powerful to out combo a large majority of the time.
Cosmic Rogue is a situational closer at times depending on the opposing player’s access to floodgates and counters once it comes down. At times, Turles will be the absolute best draw, but more often you never want to deploy him – this is why he is at 2 copies.
Demonic Evil is our SCR of choice because having access to a Bad Ring Laser type effect with access to Fruit of the Tree of Might targeting any of your Turles Battle Cards just feels amazing overall. Definitely a needed SCR for this style of deck!
Chapter 5: The Complete Main Deck
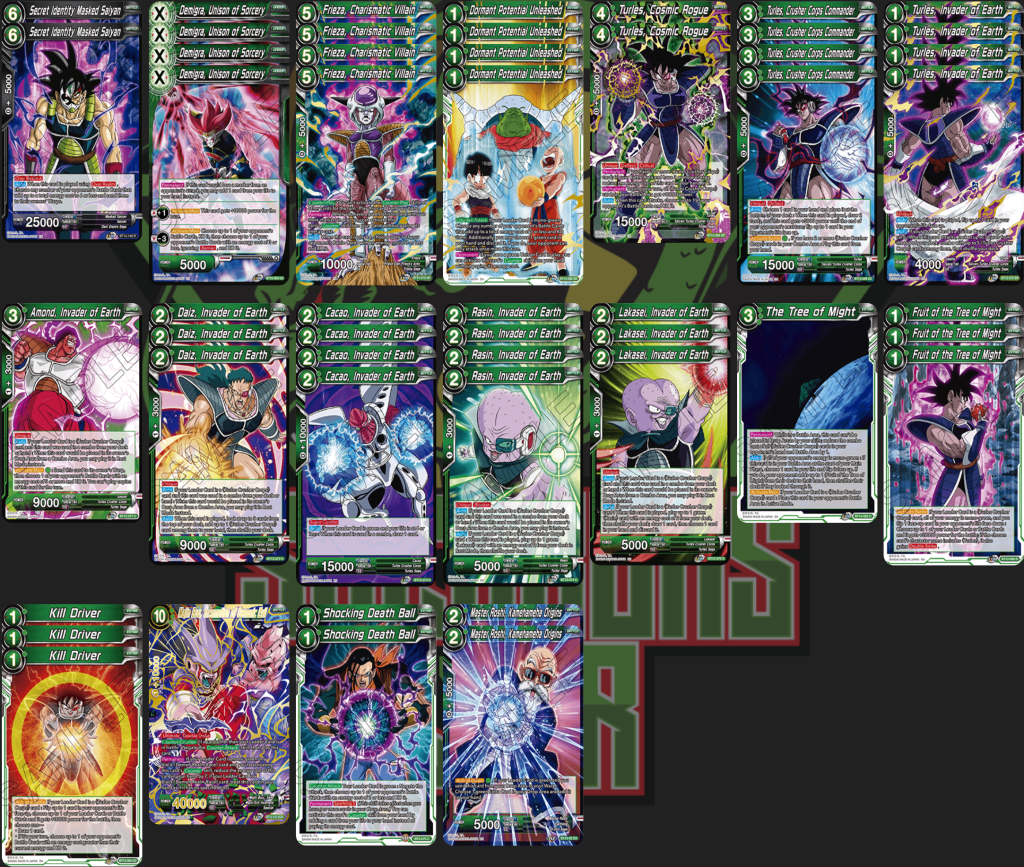
The last additions are 2x Shocking Death Ball, 2x Master Roshi, Kamehameha Origins, and 2x Secret Identity Black Masked Saiyan. Shocking Death Ball acting as a free negate the large percentage of the time is clutch, and the upside of being a hard negate that kills a relevant body is exactly the type of value we are looking for in Turles. Roshi of course is an auto include in some number due to the versatility. Secret Identity Black Masked Saiyan is just a clean answer to most singular threats and of course if boards happen to go wide.
***Yes, the list is 51 cards… but the Tree goes to the opponent’s side to start the game bb***
Chapter 6: The Metrics
Demigra Unison – 1, 1, 1, 1
Turles 4 – 2, 2
Turles 3 – 1, 1, 1, 1
Turles 1 – 1, 1, 1, 1
Fruit – 1, 1, 1
Kill Driver – 1, 1, 1
Buu SCR – 3
Shocking Death Ball (Sparking at least 50% of time) – 1
Roshi – 1, 1
This version of Turles comes in at an ACEC of 0.56 with a total cost of 28 out of 50 cards being played in the deck – this is the same ACEC rating as King Piccolo.
Chapter 7: Potential Sideboard
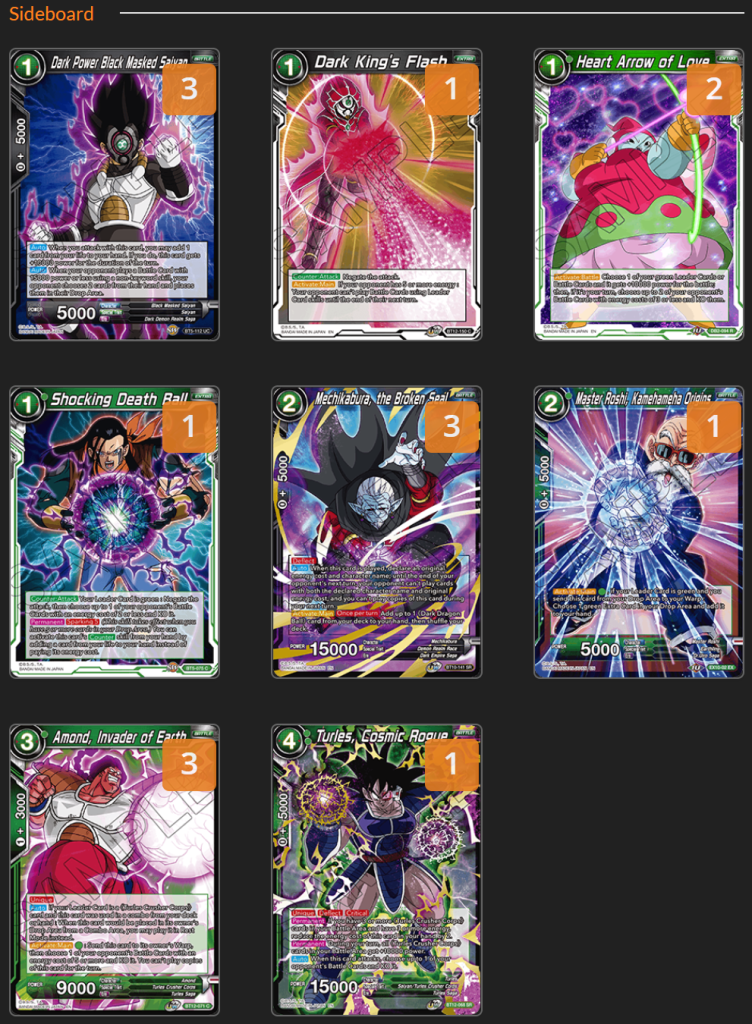
Against Syn Shenron
-2x Secret Identity Masked Saiyan
-2x Shocking Death Ball
-2x Roshi
-1x Rasin
-1x Dormant Potential Unleahsed
+3x Mechikabura
+3x Amond
+1x Dark King’s Flash
+1x Turles, Cosmic Rogue
The idea here is to steer away from our mid-range plan and make the deck more aggressive while also giving us the ability to disrupt key turns, remove Syn Shenron 9 drop, and have Dark King’s Flash as a fail safe if the game goes that long.
Against Red Broly: Br
-3x Kill Driver
-2x Secret Identity Masked Saiyan
-2x Turles, Cosmic Rogue
+3x Dark Power Black Masked Saiyan
+3x Mechikabura
+1x Roshi
Against Red Broly: Br the idea is to steer harder into the mid-range plan and focus on the disruption aspect while leaning into Fruit of the Tree of Might as our singular win condition. Siding out SIMS feels awkward, but not as awkward as having 8 black cards in our deck post board – just leaves too much room for RNG to get in the way. Being on the play with the ability to access Unison or Dark Power just feels too good to pass up. From there if you then go turn two Mechikabura to turn off the Broly Chain, you now have a vice grip on the match.
Against King Piccolo
-3x Kill Driver
-2x Turles, Cosmic Rogue
-1x Amond
+3x Dark Power Black Masked Saiyan
+2x Heart Arrow of Love
+1x Master Roshi
Against King Piccolo the plan is to stay balanced, but bring in removal and disruption that lines up better. DPBMS is a catch all that requires an answer, Heart Arrow of Love allows us to pick off some Demon Clan acolytes, and Roshi gives us more of everything we want.
Against Reboot Gohan
-2x Turles, Cosmic Rogue
-1x Kill Driver
+1x Dark King’s Flash
+1x Shocking Death Ball
+1x Master Roshi
The key to beating Reboot Gohan – don’t let them touch you.
Against Vegeks
-3x Kill Driver
-1x Amond
+3x Dark Power Black Masked Saiyan
+1x Master Roshi
Against revamped Vegeks the assumption is that we will need more copies of Dormant and a way to disrupt their free plays – DPBMS and Roshi should be enough.
Against Dark Broly
-3x Daiz
-3x Kill Driver
-2x Secret Identity Masked Saiyan
+3x Mechikabura
+3x Amond
+1x Master Roshi
+1x Shocking Death Ball
Against Dark Broly we want to shift our removal towards Amond since it is much easier to enable without having to commit right away, as opposed to Kill Driver. Mechikabura is the card that bridges us to wherever we want to be since the card shuts the whole entire deck down. Roshi and Shocking Death Ball add more ways to defend the 30k attacks without overextending defensively.
Against Green Gotenks
-3x Daiz
-2x Turles, Cosmic Rogue
-1x Rasin
+3x Mechikabura
+3x Amond
We are way better at beating Dormant Potential Unleased then they are and our deck post board absolutely shuts down Gotenks 6 drop. Between Kill Driver, Amond, SIMS, and Captain Charisma – they can’t touch this.
Against Invoker
-4x Dormant Potential Unleashed
-2x Secret Identity Masked Saiyan
-1x Rasin
+3x Mechikabura
+3x Amond
+1x Turles, Cosmic Rogue
We go full aggro by leaning more into Cosmic Rogue coming down the turn we play Mechikabura to keep them off of their invoker enabler.
Chapter 8: Make ‘Em Go Night-Night
If you have stuck with me this far you can see how Turles has the potential to make an impact on the upcoming format. What I think I enjoy the most about the deck is the fact that it can pivot so well between aggro and mid-range within the entirety of your 65. Of course the downfall of the deck is its reliance on a Crusher Corps package to actually function, but the upside of their effects opens up a ton of options and decisions for the pilot – which of course I adore. If anything Turles is a solid choice in series 12 due to having more agency over your games. Your decisions truly matter in this deck and your sequencing has to be spot on whilst you try and dodge the landmines that exist in the format. My 65 certainly isn’t perfect, but for ME it has felt the best so far. The deck takes a TON of practice, and I am in love with that. You can’t just pick it up one time and master it, it takes a bunch of match experience to truly see and feel the power level of the deck.
Thanks for reading!
#ScrubFamisBestFam #KTHXBAAAIIIIIIII
